My C22 Project Pictures

Here you can discuss Chrysler Sailing across all makes of Chrysler sailboats.
Post Reply
skyking

My C22 Project Pictures

Post by skyking »

Special thanks to "EE" for all of your help in getting my pictures online.

there are plenty more to come, and another special thanks to Mario G. for all of his help in getting the rails,Pulpit, Lifelines, etc...

I never thought that when I started this 3 1/2 months ago it would turn out so nice. I hope that these pictures can inspire someone to bring another one of these vessels back to life !!!

Image


Image


Image

Image

Image

Image


Image
User avatar
klassi1
Posts: 29
Joined: Fri Mar 20, 2009 9:57 am
Location: NW Arkansas

Post by klassi1 »

Wow! Looks really nice.
klassi1
'77 C-22
tnc110
Posts: 110
Joined: Sat May 30, 2009 6:47 am
Location: WNC

Post by tnc110 »

looks great! how many hours do you have in refinishing/painting? what is involved in the process?
skyking

Post by skyking »

first I had to clean the old sealant from the area where the toe rails attached.and reinstall the rails. thanks to the how to section in this forum, that was fairly simple.

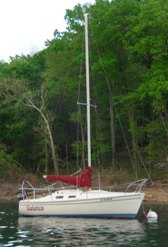
ThenI had to replace the windows, And as you probably know, I was better off making them myself. my next thought was to paint the whole boat....But after I took a closer look at it, I descided to wet sand and buff it. :roll:

although I did repaint the stern and cock pit.

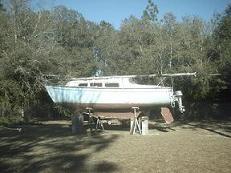
Then I spent a day sanding the bottom with 80 grit paper on a DA. ( Inhaled so much of that dust that I ended up with bronchitis for a couple of weeks!

The companion way boards were junk at best so I had my father in law use them as a template for new ones, there wasnt a tiller so he made that as well.

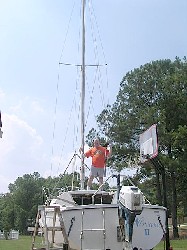
The mast was covered with tons of brown paint ( OVER SPRAY FROM WHERE IT WAS SITTING) that was another 2 days of paint removal.

there wasnt an outboard bracket, so i needed to get one and install it.

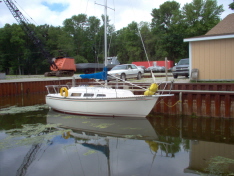
It was missing the sternrail,Pulpit,lifelines,lights ( Thanks again Mario) so i had to spend another day installing that.

the trailer is a storage rack the was converted. Lots of welding,painting & wiring there. I plan on adding a tongue extension. I think that its a must for the fixed keel.

and im sure that theres more that i forgot to mention, and thats just the outside.

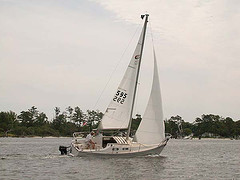
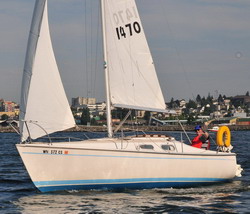
I spent a whole week of vacation last week trying to get in the water by the fourth and I missed it by one day :cry:

All in all i have spent most of my free time when it wasnt raining for the last 3 months.

AND MY WIFE THINKS IM OBSESSED??? i DID MANAGE TO KEEP THE LAWN CUT :D
User avatar
thepartydog
Posts: 337
Joined: Tue May 22, 2007 10:50 pm
Location: Crestview Florida

Thanks a lot.

Post by thepartydog »

Um.....You didn't have to mention the part about keeping the lawn cut, some of our wives read these posts....
Darin
"Ya Never Know"
1980 C26
User avatar
Chrysler20%26
Posts: 836
Joined: Mon May 01, 2006 10:28 pm
Location: Pinconning Michigan
Contact:

Post by Chrysler20%26 »

Great Job, another Chrysler saved from the scrap yard. Theas boats are worth saving, it took me three years to get my c-26 in. ( I Have Too Meney)
NYCSAILOR
Posts: 752
Joined: Thu Feb 02, 2006 6:38 pm
Location: NY, NY

Post by NYCSAILOR »

inspirational... I always debate whether working and fixing up this old boat is "worth it" or should I just put the money and effort into a newer boat.... you have encouraged me to press on with the c-26.... and in just 3 month you did more that I could ever do in ( or did ) in 10 years! It looks great! really great... what paint system did you use... any tips? also somply we sanding gave you that finish?
skyking

Post by skyking »

There were many days that I thought I should have gotten one ready to go? I still need to work on some small details. but that can be done while relaxing in the sun.

The paint was a single stage urethane. simply scuff the old paint with a piece of scotch brite, wipe real good with a grease & wax remover and spray. (Again, I only painted the cockpit & stern).

The rest of the boat was wet sanded with 1000 grit, & buffed with Mothers glaze & polish.

I have already thought about getting another project boat to take my time with??? Now that Im not hi & dry anymore !!!
User avatar
Gus
Posts: 577
Joined: Tue Jun 06, 2006 10:49 pm
Location: Wilmington - NC
Contact:

Post by Gus »

Very nice! You can see the reflection of the water in the hull, so that's a good sign.

Question, what are you discharging with that thru-hull on the port-side?

Very nice again, you made me wanna have a full keel C-22 :)
1976 Chrysler 22 Halve Maen - Sail # 595
User avatar
slane1124
Posts: 103
Joined: Sun May 07, 2006 5:03 am
Location: Atlanta, GA
Contact:

Post by slane1124 »

ok, i'm gonna ask, because i'm not the handyman... how much would just the cleaning up of the hull cost? cleanup meaning sanding, filling, and repainting. I don't have anything but small blisters, so i'm not in any hurry, just curious. you did a fantastic job!!
Robbie
'76 Chrysler 22
"Sea-Shell-E"
sail # 879
www.ndipolygraphservices.com
skyking

Post by skyking »

THE SIDE DISCHARGE HAS A FITTING ON THE INSIDE TO ATTACH A HAND BILGE PUMP. Hopefully it will not get used!!!

THE BOTTOM PAINT WAS 88.00 ON SALE AT WEST MARINE( BOTTOM KOTE,BLUE) As far as the rest of the hull I used some things that were sitting around in my garage. the sand paper was about 3.00, the water was free, and the buffer was borrowed.

Keep the sand paper soaking wet and it goes on forever. I had a few blisters that were filled with epoxy, again, extras in the garage.

so far out of pocket, (Boat & Trailer)I spent about 700.00 :lol:

OOH and that includes my 125.00 for the dry moor at the marina!!!
Mario G

Post by Mario G »

Hey Tim yours is looking great, And again how better could it have worked out with the rails and tiller.( can't thank you enough) My wife is the one to thank for the packageing of them I just had the fun of removing them from the parts boat (the parts will be on 4 other boats as soon as nick gets the seat ) I'm very glad you were able to get to sail it even a day late I'm sure it was all worth it.


Mario
C-22 Southern Wind
tnc110
Posts: 110
Joined: Sat May 30, 2009 6:47 am
Location: WNC

Post by tnc110 »

When you were sanding/buffing did you do the striping as well or did you apply the stripes after the white was polished? Also, did you use a block behind the paper and if so what did you use?

I did a 2'x 4' area on my boat this evening and it is amazing what is hiding under all that chalk!!! Unfortunately the guy i bought the boat from was planning on repainting the boat and i have noticed orbital sander marks on a few places...hope i can get them out...

Thank you for the new found inspiration!!!
User avatar
Banshi
Posts: 689
Joined: Wed Jul 04, 2007 10:10 am
Location: Jacksonville, FL
Contact:

Post by Banshi »

Looks great. Looked like yours had almost as many layers of bottom paint as mine did, the real test comes though when you struggle to make time to actually use it, it has been a couple of months for me and I am about to go zonkers!!!!!!!!!!!!!! come on fall temps and wind!!!!!!!!!!!!!!!!
tnc110
Posts: 110
Joined: Sat May 30, 2009 6:47 am
Location: WNC

Post by tnc110 »

and how in the world do you get the nuts started/tightened that hold down the stern rail. I have the small hoop that only has 2 posts and cant get the brackets mounted because i cant get WAAAAY up and under where i need to be to get the nuts on the bolts.....
skyking

Post by skyking »

I had to use an 18" extension with a deep well socket 7 thank the lord that my son has long skinny arms...
skyking

Post by skyking »

tnc110


:

--------------------------------------------------------------------------------

When you were sanding/buffing did you do the striping as well or did you apply the stripes after the white was polished? Also, did you use a block behind the paper and if so what did you use?


The strips are the same ones that came on the boat, As for sanding I choose not to use a block, I didnt want to over do it..
Mario G

Post by Mario G »

skyking wrote:I had to use an 18" extension with a deep well socket 7 thank the lord that my son has long skinny arms...
seperating the deck from the hull made it easier.....lol


Mario
75 C-22 Southern Wind
User avatar
Banshi
Posts: 689
Joined: Wed Jul 04, 2007 10:10 am
Location: Jacksonville, FL
Contact:

Post by Banshi »

On mine I cheated and used a hole saw to make hole on the inside so i could gain easy access. I am still looking for the right plug/cover to cover them. Even uncovered you really don't even notice them.
Budwick
Posts: 2
Joined: Tue Jun 02, 2009 6:48 pm
Location: Portage, WI

Post by Budwick »

Beautiful! I would agree with some of the previous posts in that your accomplishment has rekindled my desire to press on with my C22. Restore a boat and inspire legions of Chrysler owners, well done. (Well maybe not legions, a whole bunch in any case.)
User avatar
Alanhod
Posts: 1478
Joined: Fri May 16, 2008 4:30 pm
Location: Washington State
Contact:

Post by Alanhod »

It's a good life on the
Honu, 1976 C-22
My Chrysler Sailing Photos: http://s1297.beta.photobucket.com/user/ ... ry/Sailing
skyking

Post by skyking »

Alan, thank you for the compliment,..we didnt get to sail it on the 5th due to family obligations :(

But we did sail her on the 6th after work for a few hours. It has been 20 years sinse I have done any sailing, therefore we motored out onto the lake and ran with the jib sail for a while. my wife is a bit nervouse and she wants to take it slow.'

I do need to keep her happy you kow :D And as I have stated in my other post, we did have a minor leak, which forced me into taking the boat back to the house for a little touch up on the keel sealant. I found that the 3M 5200 had a fine crack in it, so I took the time to redo that..I plan on launching again this weekend and going for the whole bit.

we want to take it slow and have some fun with it.

there is a 3400 acre lake near my home called Lake arthur , thats where a few other chryslers call home as well.

I plan on getting all three of the C22's in line at some point for a nice picture???
User avatar
Gus
Posts: 577
Joined: Tue Jun 06, 2006 10:49 pm
Location: Wilmington - NC
Contact:

Post by Gus »

Never seen it in the side of the hull like that, be careful, if the boat heels past the discharge, you might get water inside the cabin.
skyking wrote:THE SIDE DISCHARGE HAS A FITTING ON THE INSIDE TO ATTACH A HAND BILGE PUMP. Hopefully it will not get used!!!

THE BOTTOM PAINT WAS 88.00 ON SALE AT WEST MARINE( BOTTOM KOTE,BLUE) As far as the rest of the hull I used some things that were sitting around in my garage. the sand paper was about 3.00, the water was free, and the buffer was borrowed.

Keep the sand paper soaking wet and it goes on forever. I had a few blisters that were filled with epoxy, again, extras in the garage.

so far out of pocket, (Boat & Trailer)I spent about 700.00 :lol:

OOH and that includes my 125.00 for the dry moor at the marina!!!
1976 Chrysler 22 Halve Maen - Sail # 595
skyking

Post by skyking »

Gus, thats a good thought, that is why we put a shut off valve on the inside to open when needed. I do like the and appriciate the thoughts & concerns.

My friend mario enlightened me on that thought.. :D
Post Reply