A litttle off topic, But I bought that little 10" Boston Whaler Squall for my grandson to play on in the lagoon, rigged like a Sunfish anybody know much about or sailed them before? I think it makes a great selfbailing dingy as well, but my sailing buddies on other sites think it is too heavy for towing. What do yall think? help old salty out
Companionway Hatch
-
keysskipper
- Posts: 156
- Joined: Sun Jul 01, 2007 6:58 pm
- Location: Lower Florida Keys
Companionway Hatch
In my constant quest to repair ALL leaks I removed the cabin hatch guides, the nylon/plastic shims are sun rotted and need replacing and I have determined that the screw holes are my "last" leaks, trying to get it all off before the SEC championship...GO GATORS !!! sorry had to get that in, anyway does anybody have a suggestion on replacement shims/guides. I wish I had done this when I painted the top side last month, I found the leaks, but I need new shims to put it back together, any ideas or sources? I could not help but see how cold it is in the midwest ouch! I kinda feel bad.
A litttle off topic, But I bought that little 10" Boston Whaler Squall for my grandson to play on in the lagoon, rigged like a Sunfish anybody know much about or sailed them before? I think it makes a great selfbailing dingy as well, but my sailing buddies on other sites think it is too heavy for towing. What do yall think? help old salty out KS
KS
A litttle off topic, But I bought that little 10" Boston Whaler Squall for my grandson to play on in the lagoon, rigged like a Sunfish anybody know much about or sailed them before? I think it makes a great selfbailing dingy as well, but my sailing buddies on other sites think it is too heavy for towing. What do yall think? help old salty out
-
clair hofmann
- Posts: 221
- Joined: Sun Apr 10, 2005 6:20 pm
- Location: S.E.Pa / Inner banks NC
-
clair hofmann
- Posts: 221
- Joined: Sun Apr 10, 2005 6:20 pm
- Location: S.E.Pa / Inner banks NC
Clair is right one with Mcmaster.
I used a nylon adhesive tape that I got from Mcmaster Carr. It was about as thick as the original stuff. I was going to use UHMW but was not sure how well it would stick since it is UHMW and is very slippery.
You should be able to get something for under 20 bucks.
Still cold up here. It got cold up here early this year!
-
keysskipper
- Posts: 156
- Joined: Sun Jul 01, 2007 6:58 pm
- Location: Lower Florida Keys
If you moved your co. south you would not have those cold fingers Ron, Oh remember we have no state income tax, and in the Conch Republic we can't remember at all. Did you replace yours? slippery sounds good
Clair, you said tape? you mean the 3M with the foam in the middle, that would be interesting, may help with the waterproofing, wonder about the UV factor. feedback? sounds easy
BEHOLD THE GATOR NATION!!
the Dolphins play some team from someplace called Buffalo at 4 maybe I can fix it early and go sailing...I know Ishould let the 5200 cure but 10-15
eadterlys and a high of 80 is tempting, low of 70 tonight Ron...sorry KS
Clair, you said tape? you mean the 3M with the foam in the middle, that would be interesting, may help with the waterproofing, wonder about the UV factor. feedback? sounds easy
BEHOLD THE GATOR NATION!!
the Dolphins play some team from someplace called Buffalo at 4 maybe I can fix it early and go sailing...I know Ishould let the 5200 cure but 10-15
eadterlys and a high of 80 is tempting, low of 70 tonight Ron...sorry
-
keysskipper
- Posts: 156
- Joined: Sun Jul 01, 2007 6:58 pm
- Location: Lower Florida Keys
-
EmergencyExit
- Site Admin

- Posts: 2954
- Joined: Wed Dec 10, 2003 5:02 pm
- Location: Mississippi Gulf Coast
-
keysskipper
- Posts: 156
- Joined: Sun Jul 01, 2007 6:58 pm
- Location: Lower Florida Keys
Keysskipper
When we got our 79 Chrysler and had our first rain we had leaks in the boat. The P.O. said it was the screws holes in the cabin hatch guides. I tock off the guides and the nylon/plastic shims, and they were broken in a couple of places. All most all the screws holes were striped out. I put down a heave layer of clear silicone under the shims filled the screws holes with silicone then a heave layer on top of the shims and placed the cabin hatch guides back on then filled the screws holes on the guides with silicone one and replaced the #10 stainless steel crews with #12 stainless steel screws. I then tightened down the screws and cleaned up the excess silicone. I have not had any more leaks in that area since then.
When we got our 79 Chrysler and had our first rain we had leaks in the boat. The P.O. said it was the screws holes in the cabin hatch guides. I tock off the guides and the nylon/plastic shims, and they were broken in a couple of places. All most all the screws holes were striped out. I put down a heave layer of clear silicone under the shims filled the screws holes with silicone then a heave layer on top of the shims and placed the cabin hatch guides back on then filled the screws holes on the guides with silicone one and replaced the #10 stainless steel crews with #12 stainless steel screws. I then tightened down the screws and cleaned up the excess silicone. I have not had any more leaks in that area since then.
Last edited by SN691 on Mon Dec 08, 2008 2:02 pm, edited 1 time in total.
Bob
1979 C-26
Easy Street
~~~_/)~~~
1979 C-26
Easy Street
~~~_/)~~~
-
keysskipper
- Posts: 156
- Joined: Sun Jul 01, 2007 6:58 pm
- Location: Lower Florida Keys
Thanks Bob, I am sure thats where it coming from, if it were not for screw holes opened when I painted the cabin I would not have noticed the leaks, did you replace the shim/guides? we have alot of wind driven rain during rainy season and we don't sail as much then so I don't catch them all, I am having matching sunbrella made for the companionway to stop those as well. I cleaned them out today will fill with git rot even though I can't find any damage, love your boat by the way and her name. KS
I did not replace the shim/guides. After I screwed the shim/guides down I ran a fine bead of silicone along both sides to ensure no water would get under then and leak.
Last edited by SN691 on Mon Dec 08, 2008 2:03 pm, edited 1 time in total.
Bob
1979 C-26
Easy Street
~~~_/)~~~
1979 C-26
Easy Street
~~~_/)~~~
-
keysskipper
- Posts: 156
- Joined: Sun Jul 01, 2007 6:58 pm
- Location: Lower Florida Keys
-
EmergencyExit
- Site Admin
- Posts: 2954
- Joined: Wed Dec 10, 2003 5:02 pm
- Location: Mississippi Gulf Coast
Windward leaked along the screw holes, some of which were stripped. I began by overdrilling some -- core was dry, although I cannot fathom how or why -- and filled with plain, then thickened epoxy. Took lots off epoxy to fill the cavities.
The old rails were quite flimsy, and the hatch is huge. I was always concerned that the combination could lead to losing the hatch if a large wave swept the deck. Also noticed that the hatch flanges were quite thin and fragile -- too many years of friction.
I began by reinforcing the flanges with fiberglass tape and epoxy, then smoothing them. I also reinforced the perimeter of the hatch, since there were some spider cracks due to the whole thing flexing.
I glued up some long teak bars and routed (actually successive cuts with a table saw, since I lacked both a router and a dado blade) grooves for the hatch track. An asymmetric U, with the top much, much thicker. This was not a bad idea, but even though I sanded the track well and coated with graphite-thickened epoxy, there's still too much friction once the hatch is about 18" open, and it binds. Wax helped, but didn't cure the problem.
The problem is the curve of the cabin top. Had I been thinking I could have made the blocks taller and run the groove diagonally upward toward the bow, thus reducing the curve.
Since I also wanted some cabin top handrails, I added those to the party. I through bolted from inside the cabin, using large fender washers as backers countersunk into long oak strips to keep the bolt edges from goring passing scalps. Used 4200 between the rails and cabin top, since I wanted strong and waterproof but not permanent.
If I were to do it over I'd still build big beefy tracks, but would bring uhmw or teflon back to the mix.
I did a really good job of bedding them, and am reluctant to remove them now, so will probably hand sand the forward end of groove's top surface to reduce the binding some, then wax it up once again.
Jeff
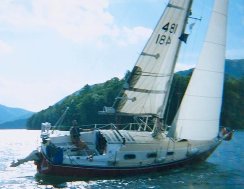
s/v Windward
1978 C-26 #481
http://www.lizards.net
http://www.sv-windward.com
http://www.chryslersailing.com
s/v Windward
1978 C-26 #481
http://www.lizards.net
http://www.sv-windward.com
http://www.chryslersailing.com
-
thepartydog
- Posts: 337
- Joined: Tue May 22, 2007 10:50 pm
- Location: Crestview Florida
Jeff
s/v Windward
1978 C-26 #481
http://www.lizards.net
http://www.sv-windward.com
http://www.chryslersailing.com
s/v Windward
1978 C-26 #481
http://www.lizards.net
http://www.sv-windward.com
http://www.chryslersailing.com
-
CaptainScott
- Site Admin
- Posts: 3112
- Joined: Wed Sep 24, 2008 10:46 am
- Location: Washington State
- Contact:
-
thepartydog
- Posts: 337
- Joined: Tue May 22, 2007 10:50 pm
- Location: Crestview Florida
Jeff,
It's clear now.
When I removed the my teak, there wasn't even any trace of plastic. Either long rotted, or removed by a PO. The hatch slides ok, a small amount of friction, and binding.
So to make it slide easier, I need a strip of something slippery 1/8" thick, wide enough to go from the mounting holes to the edge of the hatch opening, and just shorter than the teak? And I should get those from Uncle Bob? (kidding) uhmw strips from mcmaster.com
Darin
And oh yeah......
IT'S GREAT TO BE A FLORIDA GATOR....GO GATORS
Darin
"Ya Never Know"
1980 C26
"Ya Never Know"
1980 C26
This is what I used. Go to www.Mcmaster.com search for this partnumber. 76445A763
-
keysskipper
- Posts: 156
- Joined: Sun Jul 01, 2007 6:58 pm
- Location: Lower Florida Keys
-
keysskipper
- Posts: 156
- Joined: Sun Jul 01, 2007 6:58 pm
- Location: Lower Florida Keys
sure email them to ronc@columbus.rr.com I will put them up
-
EmergencyExit
- Site Admin
- Posts: 2954
- Joined: Wed Dec 10, 2003 5:02 pm
- Location: Mississippi Gulf Coast


I am looking for replacement hatches that would be more modern ( tinted plexiglass, sealed in alum frame ) and lighter and higher performance.... curious if anyone did this search yet....for either the cabin or v-berth hatches... I would want it low profile and have it look as if it belonged to the boat design and not "tacked on... I know we have some severe curves to our cabin top...
C-26, Fixed Keel # 343