Over the weekend we got two coats of the PCA Gold ablative paint rolled on. Of coarse I am an idiot and thought shorts, tee shirt and flip flops were a good idea so I ended up with about twice as many freckles as when I started the day. The paint went on very very nicely and has a good shine to it. We got enough done so we can out it back on the trailer and keep working.
Adding to my stupidness I forgot to take measurements of the old water line so i am hoping someone can help me out. I did find three measurements (bow, beam, transom) but with the curvature of the hull it is REALLY hard to get a straight line between those few points. I was thinking that if someone could measure from the bottom of the toe rail down to the top of the waterline mark (letting the tape measure conform to the curve of the boat NOT plumb measuring) every 10 holes it will be easier for me to get a straight waterline. Here is a pic...
Yeah the first thread I had seen already and tried to mark the boat and tape between those points but trying to keep the tape straight over 10' feet of curved hull is VERY hard. That is why I was hoping for closer measurements so at least I knew I was pretty close.
The second video I never thought of the line needing to be wider at the different places so I am going to make one of those projectors if I decide on a boot stripe.
Well we had another safe boat movement today. I positioned the trailer so that the runners would be far enough away from the bare hull and then lifter it up with the forklift and two high lifts just like we did before. Raised the boat just a couple inches off the wooden stands and then moved them out of the way. Slowly dropped everything to the ground and blocked the wheels.
So now she will sit on the trailer until we get the toe rails removed and cleaned. The hull primed and painted, and then getting the toe rails re-bedded. Once all of that is done I will mask off the water line and finish the bottom paint.
Hopefully by that time my dad and I will have come up with a name for her.
I am kicking around the idea of P.I.T.A
We got the toe rails off today and you would be AMAZED at how much junk was in the port side rail. Absolutely filthy and a bunch of trapped water! The starboard rail was practically bone dry and nothing but dust behind the rail. I wonder why that was?
Either way they are removed, cleaned with CLR and Simple Green, and I will be picking up some Ospho to really get those rust spots. I would hate to go through all this trouble of painting the boat to keep having rust stains drip down the boat. I was completely thrown off after I removed the rub rail and found that all of the screws were actually stainless and none of them were rusting. It was the actual aluminum rail that was rusting. Never would have guessed.
Here are some pics of the rails and the rust spots...
We also got two coats of the epoxy primer on the hull where the boat stands were, and tomorrow I will get two coats of the PCA Gold so we can be done with that. It was very nice of Banshi to invite me out to his house this weekend but life has gotten in the way so i can't make it out there. I think we might just float the boat on the trailer and mark the water line that way. It will give us practice and it will reposition the boat so it is level on the trailer
Level the boat, using the cockpit sole as a go-by, or the seats for crosswise. It will be close enough.
Go to your local rent-a-tool center and get a surveyor's laser level with remote control. Set it up about 20 or more feet away, mid-hull, and let it do the trick. It won't care about compound curvature, and you can stand next to the little red dot and mark exactly where it indicates, as close together as you wish. Just make sure the laser is level when you set it up.
As you mark the position IN PENCIL any error in boat levle will be evident when you go all the way round and hjave a mismatch. Or, you can set it up pointing at the bow and mark two sides at the same time.
I am guessing I could use a jack under trailer on the low side of the beam to get it level, and use the front wheel jack to level the bow to stern line?
I didn't know if the cockpit floor would be level when the boat was floating, but if you know it is, then that is an easy enough way to mark the water line.
No expert here, but that's how I established a level horizon when I got my first sailboat and had to step the mast. I felt it was important to level the boat so I could get a proper reading on the stick once it was up regarding rake, etc.
If you google up some pics of boat plan views, showing the horizon lines , I think you'll see that all walking or sleeping surfaces are on the same parallel as the waterline. Find the largest, widest area and go from there. It should be pretty close and any error can be averaged as you put down your temporart marks.
John
EDIT: Link to another Herreshoff design that shows the interior layout.
When I leveled EE on the blocks I laid 4 ft level across the companionway hatch slides for side to side, then set a circular bubble level on a flat board across them for fore and aft, and to double check side to side.
By slides I mean the actual boat parts the hatch sits on..would guess the mast step would be a "level" surface when boat is afloat as well..
I went out and put a tape measure on the transom. Here's a pic which shows the upper bootstrap line bi-secting the drain holes and the approximate distance from the BOTTOM of the rub rail casing. The tape is actually plumb, but it doesn't look like it in the pic. Your results may vary.
If you spot this position with the laser, after leveling, you can extrapolate the line all the way round, moving the laser as the angle of light becomes extreme. When this happens, the red dot tends to grow and become fuzzy, so try to keep the angle from exceeding the nice sharp dot threshold. As the dot goes under the stern quarters, make your mark in the middle of the fuzzy dot, because that's where you'll not be able to do much about the focus. Adjust your tape by eye at that point.
Unless you have an engineered loft chart, I think this would be your best bet at a nice looking amatuer job.
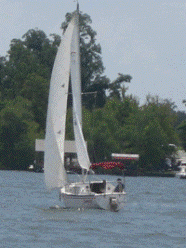
Sorry for the long delay in posts, but life has gotten in the way. My dad and I finished the painting job and it came of pretty good. It does not pass the 4' away test but I am not too concerned with that. We ended up using a laser level to mark the waterline/boot stipe but we went a little bit high. I know I wanted it to be higher than the water when fully loaded, but we went too high I think....
These are a couple pictures of the maiden voyage. This boat looks really good when the deck is clear like this...
We were lucky enough to have a very nice wind for our first sail but I am VERY rusty in my sailing ability. I am glad my dad was there to keep me in line. As you can see my hatch covers are pretty awful looking so i think I am going to paint them white like some others have done.
I am also contemplating painting the entire deck a single color for simplicity sake. Does anyone have a picture of a C-22 that is has an all white deck?
Great job on the boat. Can't help you with an all white 22 but my 26 has a white deck. My plan is to refinish the non skid in gray or tan like yours. The white throws quite a glare and shows dirt easier than a color.
Great job on the boat. Can't help you with an all white 22 but my 26 has a white deck. My plan is to refinish the non skid in gray or tan like yours. The white throws quite a glare and shows dirt easier than a color.
You did a nice job. As for the boot strap being high, I think there is an opportunity here: The next time you get a chance, just paint or apply a lower accent strip at the waterline. Personally, the deep hull and high freeboard of the C22 give a rather clunky look to the boat. A high bootstrap is one way of fooling the eye into seeing a sleeker hull.


